Tuesday, April 22, 2014

DIY Nautical Boat Cleat Towel Hooks


Last weekend, Brandon and I put these beauties together for our Master Bathroom. I am a sucker for all things nautical; stripes, anchors, boats, you name it. I recently I saw on Pinterest where someone used boat cleats to hold up mirrors here. I knew I could find a way to use them in our bathroom for a functional purpose. After a little research, it seems I am not the first one with this idea, but I was still super excited about it. When I mentioned my little idea (after I had already ordered 3 boat cleats from Home Depot here and told Brandon I had to go pick up "something" with my secret, "I have a huge project in mind" voice, hehe), Brandon quickly burst my bubble, that I in fact could not just attach the boat cleats to the wall with screws like I had in mind, because wall studs do not magically appear where you need them. Bah humbug, always the male mood killer, but that's what they're useful for right? Knowledge about studs and stuff. ;) 

Anywhoo, after some thinking I decided to check out Lowe's and see what kind of boards were big enough to fit my 8 in. boat cleat beauties. Unfortunately, all of the wood wide enough was going to be another $10 for a small board, so I decided there must be a better way. On the way home, I passed our new Habitat Restore store (these are awesome by the way!) and decided to check it out and see if I could find a reclaimed board to bring some rustic to my nautical idea. I happened upon a 6 ft. old fence post for $1.50 and snatched it up. A quick trip to the hardware store near our house and I had the 6 large 2" screws (to attach the cleats to the wood without going through), some plastic drywall anchors, and screws to attach the wood to the wall. 


Once I got the board home, we used our standing miter saw to cut the boards to two different lengths; one to accommodate two boat cleats for our bath towels and another smaller one to hold the hand towel near the sinks. I decided to cut the corners off as well to soften the harsh corners. I really love how much personality the reclaimed board had with the knots and such so I made sure to get at least one on both boards. Next, we just centered and screwed the boat cleats into the wood. 


Here's the before of our hand towel hook. For our bath towels, we had just been using an over the door hanger so it is much nicer looking not having that anymore now with our new hooks!


Like I mentioned earlier, we used drywall anchors to attach the boards because there were not studs in the center of each wall like I would have liked. As you can see below, we just screwed two wall screws through the boards in the desired locations just enough so that they showed through on the other side. This allowed us to make marks where we screwed holes for the anchors by pushing the board with the nails against the wall where we wanted them placed. After putting the anchors in we could then align the screws with the holes more easily and screw them fully into the wall. Voila!


Above you can see my recent Moroccan Trellis Stenciled wall along with the new boat cleat hooks!

While I was snapping AFTER photos for y'all, I realized I had never shown the rest of the Master Bathroom and as we continue making improvements, now you can get an idea of what it looks like with some improvements but before painting.

Recently, I painted this anchor on canvas for over the garden tub with inspiration from here. 


Remember, those nautical vases on the window sill that I had made for our Rehearsal Dinner Centerpieces. Here's their re-purposed home.  


On the other side, we hung Ikea Ekby Jarpen shelves that I filled with jars of toiletries and hair accessories, as well as a print of the cabin from Safe Haven that we picked up on our Mini-Moon in Southport, NC where it was filmed. The bottom framed photo is one I took on a hike on my iPhone and blew up. 


Hope you liked the nautical touch!  

Peace, Allison 


Featured on: 


Wednesday, April 16, 2014

Pantry Update & Simple, Spring Scrap Fabric Wreath


Hooray!

I have finally found a place in the Columbia area that sells Benjamin Moore paint! I have been coveting a lot of their colors for the walls (and doors) in our home so I finally picked up a pint of the Palladian Blue that I've seen on a pantry door here and a gallon of White Dove for another furniture project that is in the works. Of course, on the night that we bought the paint I had to crack open the pint of Palladian Blue and paint the pantry ASAP. I mean, dinner could wait, right? 

Here's a quick before & after. 


I really hate that awful yellowish neutral that is on basically all of our walls but we're hoping for a warm, white tone to brighten up the room. Actually, I slapped on a little of the White Dove to see how that looks (you can see below) and I think that it might actually be the winner. Let me know what you think. 


While I was on a creative kick, I took some of the scraps from my latest Ikea Tupplur Curtain Hack and wrapped them around a cheap wreath form I had picked up at Michael's. I didn't even attach the fabric with glue, just wrapped it on and tucked it in at the end. I kind of like the rough edged look and I think it makes the pantry door look even better.


These two cheap (practically free!) updates make a world of difference in our kitchen. What do you think? What are you doing to bring some Spring cheer into your home? 

Happy Spring!
Peace, 
Allison 


Tuesday, April 15, 2014

What's with the name? :: HousLoveDogBlog


Alright, alright I know what you've been thinking...

Why the heck is Allison spelling Hous without an "e" in her blog name. Isn't that hard for people to remember? Is she just trying to be original in some way and stand out amongst all of those other blog names that talk about Houses and Love and stuff? Okay, maybe your right.... a little. I actually chose my blog name because my maiden name is Housholder... yes without the "e." Yes, it still is pronounced like House- holder. All my life, my last name has been a struggle for people to comprehend that Hous indeed has no "e" and now that I am officially a Fitzgerald and not a Housholder, while it is much easier (essentially because it's much more common), I kind of miss being able to correct people as they would spell it and I would say, "it's House without the e and then add holder." 

I had it down to a science. And while people would still write it the wrong way despite my clever saying, the fact that those who knew me knew would gradually learn to write Housholder the right way (without the e, duh!) and even sometimes drop the "e" on the actual noun House when writing elsewhere because they were so used to seeing my last name without the "e," made me realize I was proud to be different. I was proud to not be a Smith or Miller (no offense to those Smiths and Millers out there) but a Housholder, like a strong, reliable, relatable house. A house that while full of belongings that some people would classify as merely "things," certain people come back to everyday and feel "at home" because of those things. 

I am a "thing person" for sure. I was that kid that was in the makings of being a hoarder from age 3. Before you stage an intervention, don't worry, I only began hoarding papers and toys at the time (totally age appropriate hoarding, right?); but, over the years I have found the benefit of the collections of small trinkets I have gathered and I honestly cherish them. I always buy souvenirs when I travel places. Whether it's a t-shirt or a local artist's painting, I like to have small reminders throughout our home that make me think of those fond memories. On the other hand, the many antiques I scavenged from my grandparent's homes and in the corners of thrift stores, bring so much history and interest to our home in a more personal way. My DIY projects also have a special place in our home and heart because they were handcrafted by me for a particular place in my home. While I may be getting off topic, what I mean to say is that the Hous in my blog name represents so much more to me than just the noun, house. It is essentially who I am and what I want to share with my readers. 

Of course the rest my blog's name, the LoveDogBlog, is also very important to me, but those are much more straight forward. You can read about the Love portion more here and of course our furry child, Rhiley, is a very important part of our life as newlyweds. I'm sure our life will change and grow dramatically as the years go on and we start a family down the road but for now, this is who I am and I hope to grow and evolve along with HousLoveDogBlog. 

I hope my explanation of HousLoveDogBlog's name shows you a little more about who I am and what I am all about. My hope for HousLoveDogBlog is that it inspires even just one person to not only look at Pinterest and decor magazines and say, " I can do that," but actually go out, get the supplies, and make it. 

So now that you know, it's House without the "e", LoveDogBlog. Yah dig?

By the way, what's the consensus on the logo at the top? Any suggestions? 

Peace, 
Allison 


Sunday, April 13, 2014

IKEA Hack: Fabric Covered Tupplur Blinds


Hey Y'all! 

Yes, I know I just said Y'all. Seriously, I find myself resorting to saying Y'all a lot more recently. I guess that's what coming up on my two year anniversary of living in South Carolina (May 14th to be exact) has done to me! I am almost an honorary Southern belle, y'all. Too much?! Okay, on to my newest project that I am super excited about! 

I forget where and when the idea to get pull tab curtains from Ikea and put fabric on them came to me, but it has been on my project to-do list for quite some time. I picked up the Ikea Tupplur Blinds in two different sizes, the longer version for the window over the kitchen sink and the smaller one for the only clear glass window in our master bathroom. The great thing about these blinds is that you can custom fit the blinds to fit any size window. All you have to do is get a size longer than your window and then cut the blind and pole down to size. 


IKEA Tupplur Blinds

The installation process is pretty simple overall; Just make sure you get your measurements correct and leave enough clearance for the brackets and the spring mechanism on the left side of the blind. I won't go into all of the details of the installation process since Ikea gives an instruction sheet with the blinds, but as I said before be mindful of the measurements and check them multiple times before cutting the blind and pole! Better to go longer and keep cutting down in increments than cut too small the first time. 

The reason I wanted this type of blind in the bathroom is because obviously being a bathroom we kept the blinds closed all of the time because the window opens up to our neighbor's house. However, with the Tupplur blinds covered with a patterned fabric, I was hoping it would brighten and liven up the bathroom as well as create an easy way to let in some light during the day and pull it down easily at night to maintain privacy. Also, if you notice the contractor installed the blinds on the outside of the window frame... which completely baffled and irked me every time I looked at it. Now the blind fits nicely in the window frame and all is well! 

Master Bathroom Before:
The shelves are Ekby Jarpen shelves from Ikea as well. 


Master Bathroom After: (They look super boring white but just wait!)


As for the kitchen, I really just wanted some fun pattern on the window that still allowed enough light in with out adding actual curtains that hang outside of the window. 

Kitchen Before:


Kitchen after: (Again they look crazy boring being white!) 

Once the hard part of installation was done, the fun part of picking fabric came in! I knew I wanted a large pattern that was classic and fun for both areas of our home. I ended up going with the damask pattern in a yellow for the kitchen to brighten it up and a gray for the bathroom to tie in the grey accents in our bedroom. I found both of these on Fabric.com, the yellow one here, and the gray one here. I bought 3 yards of each fabric and even found a coupon code online as well as free shipping for $30+. 


Once the fabric came in, the next step was finding a way to attach the fabric and hope that the pull mechanism would still work with the 
added thickness. 

What you'll need: 
   -Tupplur blinds
   -Fabric
   -Spray Adhesive (I used Elmer's craft bond.)
   -Tacky Glue
   -Iron 

I started out by unrolling the blind on the floor and laying the fabric centered on top of the blind with at least 3 inches of excess on all sides. You'll notice the fabric does not reach the pole. This is okay because the curtain is only pulled out to the size of the window so it will not be seen. That being said, you could probably cut the fabric needed down to 2 yds., I just personally wanted to cover the majority of the length of the blind. 


I made sure to keep the fabric centered by putting a small mark in the center of the blind (as seen below) since it would later be covered up anyways, and placed the center of my pattern directly over it. Once the fabric was centered throughout, I folded up about a foot section at a time, sprayed the adhesive, and then used my marks at the top and bottom to make sure I lined the fabric up before placing it on the glue and pressing from the center to the edges to set the adhesive on the fabric and reduce any puckering/ bubbles on the fabric. 

At this point, the fabric was fully attached by spray adhesive to the Tupplur blind with about 3 inches of excess that was not attached to anything yet on all four sides. 


The next step I will show you is how I dealt with the excess fabric on all four sides once the fabric was already attached to the blind. 

For the top, near the pole, I folded the fabric down about 3-4 inches. I then folded down the raw edge about an inch and ironed it to create a seam. 


With the 1" seam now ironed, I then sprayed a thin line of adhesive to the edge of the blind and pushed the fabric down again in the middle first moving to the outer edges. 


I then cut the 3" excess on the two lengthwise sides of the fabric down to about 1/4". You want enough fabric to be able to place some glue and fold over the edge for a nice clean look from the front. 


Next, I dealt with the 3" excess still remaining on the bottom end where the pull tab would be. FYI, there is a wooden rod in the bottom portion to make it easier to pull. I wanted to create a clean look from the front side again so I cut the fabric down to about 1" leaving enough for me to fold it over, tuck the raw edge under, and apply Tacky Glue to hold the fabric down. 


The side of the pull tab looked like this (below) after I had glued all of the raw edges under and covered the width of the wooden rod. 


Finally, the last step was to apply Tacky Glue to the two lengthwise sides with the now 1/4" excess of fabric, fold the fabric over, and press firmly. 


When all was said and done, the backside looked like this.


The last thing to do was flip it over, admire it, and then roll it back up. The only issue we came across with re-installing the blinds with the new fabric cover was that the brackets needed to be moved down just slightly to allow the now thicker rolled up curtain to have enough clearance to be able to roll and unroll smoothly. Finally, it came down to whether the pull mechanism would work with the added weight and thickness and HALLELUJAH, IT DOES! 

I really love the patterned look without bulky, dangling curtains. It really adds a little excitement to a once boring, constantly blinded window. While the Tupplur blinds are technically blackout shades and don't let in a ton of light when completely pulled down, using a light colored fabric with a pattern adds it's own kind of light to the room in my opinion.


Once I found the best way to attach the fabric for the bathroom curtain, it was much simpler the second go around for the kitchen. I think I took a good half hour off of the amount of time it took to complete even though it is actually larger. 


How do you like it?! A whole new look for both rooms, eh? 

Hope you enjoyed and if any of the instructions were confusing and you would like clarification while trying this out, please feel free to comment or email me at HousLoveDogBlog{@}gmail.com.

Peace, 


Saturday, April 5, 2014

That One Time I Spent 22 Hours Stenciling Our Bedroom.


Once upon a time I had this wonderful dream to stencil a wall in our master bedroom with the smallest stencil known to mankind.... Don't get me wrong, I absolutely love the Moroccan Trellis Stencil I bought from Sarah M. Dorsey Designs, it just was a beast to use for an entire wall, especially for a stenciling noob like myself. 


Sarah's blog is one of my absolute favorites because she always makes awesome, large scale DIY projects basically from scratch, all the while making it look EASY PEASY. Obviously, after seeing her wonderful stencil projects, I thought, "I could totally do that to an entire wall!" Little did I know, friends...little did I know. 

I had painted the other three walls in our master bedroom what seems like ages ago. Okay not quite ages, but all the way back in August before our wedding. Knowing I would eventually (ahem, 6 months later) want to stencil the wall behind the bed, I just primed over the old burnt orange wall color and left it white for the past 6 months. Remember this oldie but goodie from the original house tour?? So happy it looks much different now! 

April 2013-BEFORE

August 2013- PROGRESS
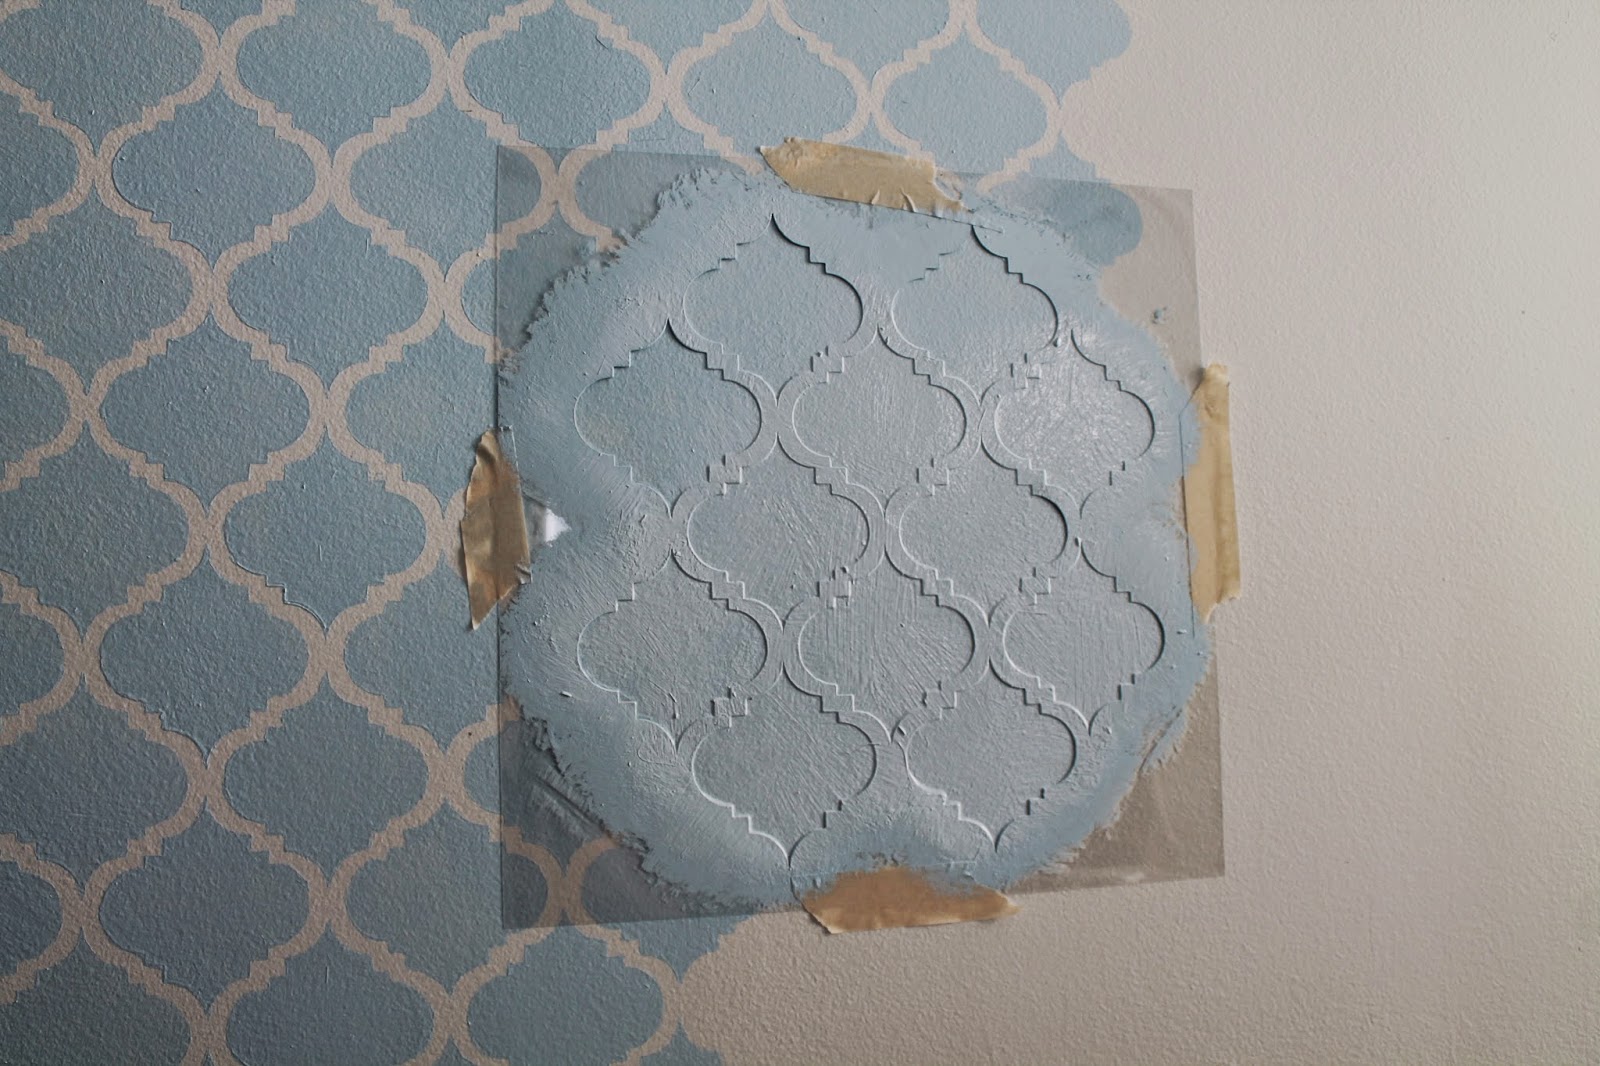
You can see the size of the 16" x 16" stencil taped to the wall in comparison to the entire wall. 
I finally mustered up the courage to tackle the beast of a stencil wall late in February and decided to take it slow and steady over multiple days. Even then, it took me three days worth of work split up over four weeks, and a combined total of 22 hours to complete the entire wall... 

Day One- 8 Hours (Finished the section behind the bed all the way up to the ceiling but forgot to take a final picture.)

Day Two- 4 Hours 

And finally, after a 10 hour session last week and because I was finally getting a system going, I was able to finish the right side as well as the entire left side.

I have a sincere love/ hate relationship with this wall. I love the final look, but the size of the stencil was very small which made it difficult to keep level. Needless to say, there are definitely some uneven spots and other areas where I had to "piece" together the single trellis designs to make it fit and look semi-even. My inner perfectionist was crawling into a corner the entire time but in the end, it is very minute and hardly noticeable to anyone but myself.

Without further ado, here's the final product!!

Day Three- AFTER 10 hours

I love the subtlety of the stencil being painted in the same Martha Stewart Heavenly Blue as the other walls and yet up close the pattern is very intricate. The gold, white, and black accents throughout the room also help make it pop which makes it more modern looking. Also, you may notice I added the Pottery Barn duvet cover, grey textured curtains from Target, and the two glass and brass lamps from Target recently. One of my favorite parts about the lamps is the fact that you can seen the stencil through them. 


I used Martha Stewart Stencil Brushes for the entire wall (I got them for 40% off at Michael's which came to about $10), mainly using the largest brush in the set but sometimes varying to the smaller sizes for the tight corners. Sarah's stencils come with an instruction sheet on how to best paint the stencil so I followed her directions pretty closely. I would start by taping the stencil on the wall where it lined up with the already stenciled part of the wall and then start at the top left trellis pattern pulling in from the top and bottom first, then the sides, and then diagonally across each trellis to complete the stencil before letting it dry and re-taping it to a new section. I suggest watching (more like listening to) an entire season of a beloved show (for me it was DVR'd episodes of Walking Dead, Grey's Anatomy, and Scandal!) as well as jelly beans or small candy for sugar boosts which helps keep the motivation level up. ;)


Another one of my favorite parts of the wall is where the painted wall meets the stenciled wall. Something about it just makes me giddy that I actually completed the wall. 


I also spray painted the bottom of our nightstand baskets in a color block of white to offset the dark basket and help them match better. You can find the DIY His + Hers Signs here, the His + Hers Etched Glasses here, and the anchor coasters here. 


I can't tell you how happy I am to have this project under my belt. I had a mixture of anxiety and dread going into this stenciling adventure, but I am super excited with the finished product. It is just one more step closer to finishing our Master Bedroom so I can reveal the entire thing! 

All that's left is: 
:: Buy bigger leaning mirror 
:: Reupholster and add legs to the bench at the end of the bed
:: Find a round table to make a half table out of. 
:: Buy a King sized bed frame (Long Term Goal) 

Overall, the TIPS I can give to a first time stenciler are:
1.Try to find a larger stencil if possible (if not use a level frequently)
2. Take it slow at first in order to be as accurate as possible. The beginning stenciled areas are the most important to keeping the pattern even and regular. 
3. Clean the stencil frequently. One of my main mistakes was letting the paint continue to cake onto the stencil which was much more difficult to remove later.
4. Use very little paint. More paint means a less accurate pattern. Use two coats if necessary. 
5. Don't beat yourself up about small irregularities. Small mistakes are hardly noticeable in the big picture.
6. Try not to get too overwhelmed if you're doing a large area. There were many times when I called Brandon up into the room and attempted to convince him I should just paint over the entire thing. Thankfully he pushed me to finish it and I'm glad I did. 

Hope this helps! 

Here's me, signing off! 

Linked up with Inspire Me Please. 

Peace, 
Allison 


Related Posts Plugin for WordPress, Blogger...